“The Craftsman movement… stands for the rights of the children to health and happiness through an education that will develop hands as well as heads.”
Stickley, Gustav, “The Craftsman Movement: its origin and growth,” The craftsman, October 1913.
Craftsman Kids is where you’ll find some of our favorite handcrafts, activities and old-fashioned games for young craftspeople!
Check out more Craftsman Kids projects on Pinterest!
Create your own book or zine from single piece of paper.
You'll need:
- 8 ½ x 11' paper
- Bone folder
- Markers, color pencils, or other drawing tools

Instructions:
- Fold paper in half lengthwise (hot dog fold)
- Fold paper in half widthwise (bring the short ends together)
- Fold each of those halves in half again. (fold each end to the center)
- Unfold paper.
- Fold in half widthwise and cut along center from fold to the next crease - from point A to point B as shown.
- Fold back in half lengthwise.
- Push ends toward each other to form a book.
One-Page Book ideas:
- Make a book about a single letter or number.
- Make a book about a color.
- Collage on the sheet and then write on it after you fold the book.
- Make a book about one word.
- Make a book about an idea that is very important to you.
- Make a joke book.
You'll need:
- Heavy weight paper, like cardstock
- Laundry starch (or make your own, see instructions below)
- Food coloring or acrylic paint
- Toothpicks
- Newspaper
- Plastic tub, ex. shoe storage box
To make starch:
- Add 4 cups hot water. Cook in microwave until thickened. (2 minutes, stir every minute)
- Mix ½ cup corn starch with ½ cup cold water.
- Let cool. Thin with water.

Instructions:
- Pour ¼ to ½ inch of liquid starch into your plastic tub
- Float dots of food color on the starch. OR Add drops of liquid acrylic paint, make sure your paint is thinned with an equal amount of water
- Gently swirled the paint colors into patterns with a toothpick.
- Lay paper on the surface of the starch. Press slightly to make sure that the marbled design transfers to the paper evenly and there aren't any air bubbles.
- Rinse off starch under a faucet and lay paper flat to dry.
- Use a strip of newspaper to clean off the surface of the starch and start again!

To flatten the marbled paper: After marbled paper dries, press between two books, or iron between two sheets of paper.
What else will you marble? Bookmarks, gift tags, birthday cards, paper chains – paper, cardboard, wood, canvas. The possibilities are endless!
NOTE: Acrylic paint is permanent; protect your work surface and clothing! Cover your work surface with a plastic tablecloth or other protective covering.
This recipe makes a play-dough like clay that can be used for crafts, sculptures, ornaments and other projects and can then be baked to a hard finish.
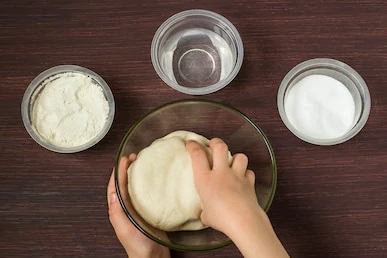
You'll need:
- All-purpose flour – about 2 cups
- Salt – about 1 cup
- Water – about 1 cup
- A large mixing bowl
- Rolling pin
- Cookie cutters
- Pencil
- Ribbon
Instructions:
- Measure out your ingredients.
- In a large mixing bowl, stir together the flour and salt
- Add water SLOWLY while stirring to form a dough
- Form the dough into a ball and knead for approximately 5 minutes, until all ingredients are combined and smooth. Add a bit more flour if the dough is too sticky or a bit more water if it's too dry. Let dough rest.
- Use flour on your workspace to prevent the dough from sticking.
- Roll out your dough using a rolling pin until you have an even pancake about ¼ - ½ inch thick.
- Cut out shapes using cookie cutters.
- Using a pencil, punch a small hole in your clay, not too close to an edge and not in the very middle.
- Let air dry or bake in a 200 degree oven for 1 – 4 hours. Baking time will vary depending on the size and thickness of your crafts. Projects should stay in the oven until hard and dry.
- Once your project is out-of-the-oven, dry and cool, string ribbon through this hole and tie into a loop. Now you have a salt-clay ornament or gift!
Notes:
Cover your workspace with an inexpensive plastic tablecloth to make cleanup easier!
Add food coloring to clay while kneading OR paint with acrylic paints after it is dry.
Make your own carnival stilts! These are great outdoors on a grassy area, or indoors on carpet.
With the help of an adult, you'll need:
- Two 28 oz tin cans – oversized cans of crushed tomatoes or ground coffee work best
- Strong string or twine.
- Can Tapper (or hammer and large nail)
- Scissors
Optional:
- Paper
- Markers
- Tape
- Electrical Tape
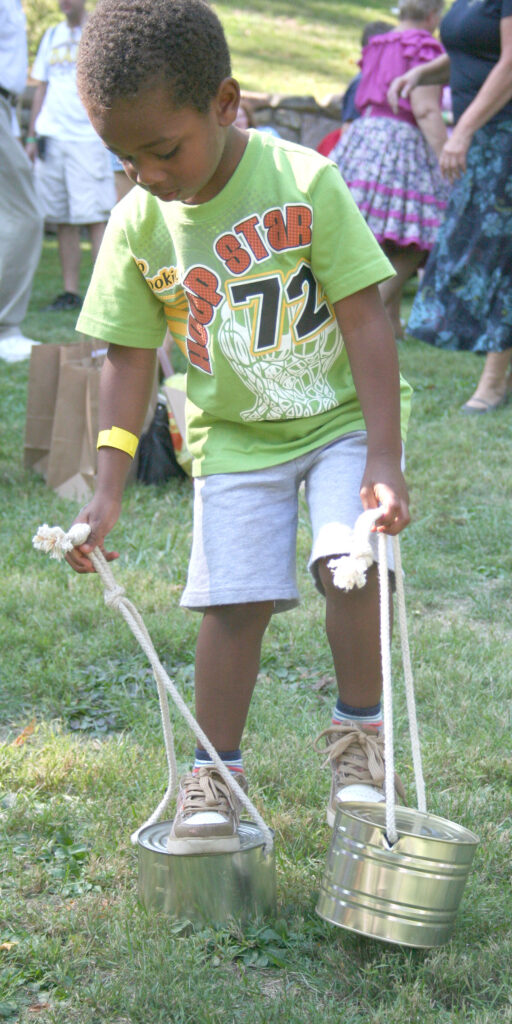
Instructions:
- Remove labels from cans. Wash in warm soapy water and dry. An adult should check for and remove any sharp edges.
- If you'd like, cut paper to fit around the side of each cans and decorate with markers, or whatever you have around the house!
- Turn cans over, bottom side up. Wrap your decorated paper around each can and tape to secure.
- Using your can tapper, have an adult punch holes on either side of each can, near the top. The holes should be on opposite sides, and at the same height. (You can also use a hammer and large nail to punch these holes).
- Thread your string or twine through both holes and tie loose ends together to create a loop. The knot should be inside the can to avoid fraying. Leave as much length as needed depending on the height of your child. Have your child stand on one of the cans and trim the twine so that the handles will be placed roughly at the height of their outstretched arm.
- For slip resistance, especially if you'll be using your stilts indoors, add electrical tape along the bottom edge.
- Stand on your stilts, hold the strings tight and walk!